Thursday, September 16, 2010

Winged Ape From "Queen of the Black Coast" Third in a series


Hey All!
Here is my newest Conan based custom: The Winged Ape Demon thingy from the awesome Conan story, "The Queen of the Black Coast". This strange creature gives Conan and the crew of Belit's pirate ship a run for their money and comes as close as anyone (or thing) ever does to killing our beloved Cimmerian. In fact, if not for the intervention of the spirit of Conan's beloved Belit, this oversized flying monkey would have made short work of Conan. The scene in which that occurs is of course the inspiration for the cheesey scene in the 1982 Conan film in which Valeria returns from the dead to save Conan's life..."Do you wanna' live forever?" Gimme' a break. Anyway, This guy sports an original head sculpt made from Sculpey of which this is my first. I'm pretty proud of it and am looking forward to doing more of the same in the future. The body is a Venom figure with wings from a Nemesis Enforcer figure from GI Joe. The rest of the detail is sculpted on with Ave's Fixit Sculpt. I would love to know what you think. Please feel free as always to leave comments and critiques.

Monday, August 9, 2010

Conan: Frost Giant; Second in the series.


Hey All!

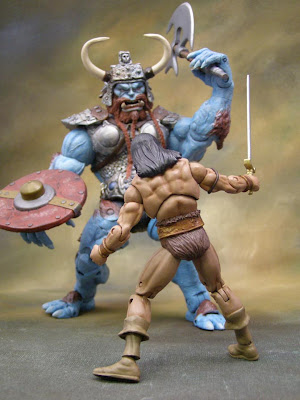
Next up in my series of Conan related figures is one of the sons of Ymir... The Frost Giant from the Robert E Howard tale: "The Frost Giants Daughter". This particular tale is probably one of Conan's more off beat adventures as it involves his encounter with the apparent apparition of a beautiful naked woman on a snow covered battlefield upon which he is the only survivor. The woman turns out to be the daughter of Ymir the frost giant and it's her custom to peruse battlefields in search of wounded or dying soldiers to seduce and lead to her two frost giant brothers who eagerly dispatch their victims and serve their smoking hearts to their cruel father. Conan, of course slays both the giants with ease and proceeds to attempt to take his just desserts from their deceptive sister.
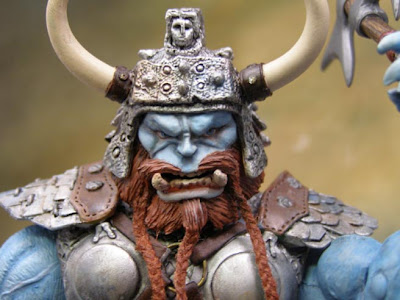
Staying true to form, Howard is very vague in his description of the giants and most artists (Frank Frazetta and Barry Smith, for example) have depicted these guys as really tall viking types. I took some inspiration from Frazetta's cover painting for "Conan the Cimmerian", and the unproduced Frost Giant "build a figure" from the unreleased series of "Legendary Comic Book Heroes" and some form my own imagination to come up with the scary fellow you see here.
He started out life as a Marvel Legends Beast figure and takes accessories form various figures from that scale. His mail armor is sculpted as are his horns and facial detail. The braids in his mustache are braided kite string. I added the "decapitated head charm belt" as not only a way to add some character, but also to help clarify the scale of the figure. Strangely enough, they are both modified Star Wars Han Solo heads I had lying around the studio. I had a blast doing this guy. The larger scale was liberating to work with, but it took forever to paint him! I need bigger brushes if I'm ever going to work in this scale again!

Saturday, July 31, 2010

The Savage Sword of Conan: First in series


Hey Folks!

I'm really excited about my new series of custom figures of which this is the first. I am working on a series of custom figures based on Robert E. Howard's Conan the Barbarian, specifically inspired by John Buscema's magazine work, but also inspired by other sources such as the work of Frank Frazetta, my own imagination, and my own interpretations of the descriptions taken directly form Howard's writings.
First up is the man himself, Conan the Barbarian. Decked out in his loin clothe, arm band, bucanneer boots and sword taken directly from John Buscema's work on "Savage Sword of Conan" from the 1970's. The recipe is as follows:
Head: MU Punisher
Body: MU Warpath
Hair: Movie Baroness and sculpt
Belt: MU Namor
Sword and sheathe: Cobra Commander

I thoroughly enjoyed this guy and am looking forward to presenting my current wips: Frost Giant, Turanian soldier, Pictish warrior, Vanir warrior, Hyrkanian archer..... and more! Thanks for looking and as always comments are appreciated!

Sunday, June 13, 2010

Billowing (or any other kind for that matter) cape tutorial.


Hey All!

O.K., I have to give my wife serious props on this one. I was sitting around wracking my brains trying to figure out how the hell I'm going to do the cape for my new Dr. Strange custom. My wife senses the tension and asks me what's wrong. I tell her. She by reply, imparts upon me a craftswomans technique of creating rigid shapes like bells and roses etc. out of fabric as embellishments on decorative pillows and blankets, etc. The following is a step by step tutorial as to how we took that decorative technique and applied it to making capes for Marvel Universe figures. I am excited to share this easy technique that will help you customize a cape that will suit your figure to it's specific needs.

What you will need:
A portion of a 200 (or so) thread count bed sheet, white glue, water, scissors or an exacto blade, hot glue gun, clippers, and items of various size to prop up your wet cape (to be explained later), and of course a hero or villain to endow with your cape!

First take your portion of bed sheet (hopefully one that will have at last one factory edge) and iron it so that it is smooth and free of wrinkles. Then measure out the portion for the cape. This will vary from figure to figure. Dr. Strange's cape was huge... bigger than the figure could handle... as that is the nature of that figures cape. Magneto's however, is measured to the figures body and made in realistic proportion. The choice is yours. Size your cape based on the need and feel of your figure. Next, use a straight edge and a pencil to rule the shape of your cape (it should taper a bit at the end that connects to the figures neck, but again your judgement and trial and error are paramount) use a scissor and or an Exacto blade to cut the shape from the sheet making as straight a cut as possible. Don't worry about rough r frayed edges (which are inevitable) as you will be able to correct them later as directed.
Taking the tapered end (the one that will connect to the neck) begin to fold the edge like an accordian and once completed return to the ironing board and iron the creases so that they are permanent. These will be the capes creases at the neck which will be the basis of the rest of the natural folds that will occur as you shape and form the cape to it's desired configuration.
Next grab your hot glue gun and begin to glue the accordian end of the cape to the figure as per your design. Mix the glue. Make a mixture of 50% white glue and 50% water. Taking a large, broad brush begin to coat the outside of the cape in the mixture being careful not to get any glue on your figure (keep a clean, damp cloth nearby for any mishaps). When completely saturated you will need short item nearby to prop your cape up to the desired design. Whatever you have will suffice. I grab nail polish bottles of various sizes from my wife's side of the medicine cabinet (thank God she's understanding), but anything at hand (and the right size) will do. Stand your figure and prop the cape onto the objects Your cape will be wet and soggy at this point. No problem. Let it dry for about an hour and return to it. At this point you will begin to be able to shape the cape into any configuration you desire. Once you have it you can let it dry overnight. Don't get to attached to what you've created, though. The next step is likely to cause some changes.
OK. You wake up the next morning and your cape is rigid and cool. Now it's time to pain the underside of the cape, again being careful not to get any glue on your figure. Keep in mind that second coating will cause your cape to once again become malleable so you will once again need to prop it up and form it after about an hour to your desired configuration. Be creative! You can use just about anything to prop and form your cape. Keep coming back during this stage and curl edges, pinch folds, etc. to make your cape as cool as possible. The possibilities are endless. Each time you make a cape you get better at it!
Once this second side is dry and rigid your cape is done. At this stage you can take your clippers and carefully clip the rough edges and stray threads off of the edges of the ridged cape. All that needs to be done now is to prime and paint it. It is imperative that you prime. The glue will reactivate if you put wet (watery) paint on (it is important that you thin the paint to the consistency of milk to coat the cape in two or three thin coats). The coat of prime will create a barrier between the unstable glue coating and the fluid paint. Once You're painted up you will not believe how cool your cape will look!
I hope this tutorial was helpful. Please feel free to contact me with any questions.


Mighty Marvels Malevolent Mutant Master of Magnetism... MAGNETO!


Hey All!

I hope this posting finds you well. My newest custom is Magneto in the Marvel Universe scale. I've been wanting to do this ever since I first saw this figure. I could not have been more disappointed with Hasbro's 1:18 scale offering of Magneto. He has always been one of Marvel's most powerful and imposing figures and his use of the stumpy Daredevil body and lackluster cape made his plastic countenance a poor representation of this malevolent monarch of mayhem. I replaced the stumpy torso with that of Namor the Submariner, cut the cape from the collar portion and glued said portion to the figure. The cape was made using the same technique as was used to make my recent Dr. Strange custom. The Magneto offering is the subject of a tutorial explaining the cape technique which I will be posting very soon. Watch for it... and as always comments and critiques are welcome and appreciated!

Sunday, June 6, 2010

Repaints... My favorite pastime!


Hey All!

Truly, nothing makes me happier than a great sculpt with a poor factory paintjob! To my reckoning it's a customizers dream! Nothing pleases me more than the excitement of releasing that poorly painted bauble from it's plastic prison and using paint and brush (and pastel) to release and enhance the beauty of the sculpt!
Todays offerings are a good example. Taking a break from heavy modifications and sculpting after my Doctor Strange custom, I decided to do a few simple repaints. Very easy... Very satisfying... and very good at gearing me up for the next big project.
First up is Face from the A- team. These figures are great, but the head sculpts (which are decent representations of the movie actors) suffer from some pretty horrific paint apps. I have all 4 members of the team, but Face is the only one I've had a chance to paint. The head sculpt is a great portrait of actor Bradley Cooper and I couldn't wait to paint him up.
Second on the card is the Marvel Universe Enchantress. This one bugged me beyond belief. She's supposed to be a goddess of seduction and yet she was completely ugly. A simple repaint brought out her beauty and her penchant for evil.
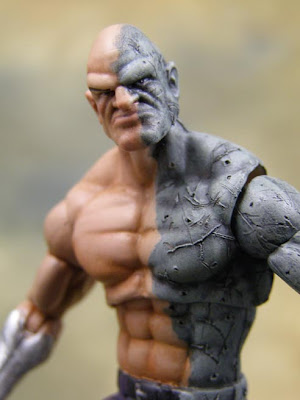
Thirdly is the Marvel Universe Absorbing Man. I can't think of a figure that needed a repaint more than this guy! Terrible! At first I was not impressed with his ugly mug and funny boots- he sort of reminded me of Popeye. After repainting him, however he has become one of my favorite figures and in my opinion the best offering of the character to date. He took a little bit more than just paint, though. I scarred him up with a carving tool and an exacto knife to texture him up for his concrete effect. I really enjoyed this guy- he was a complete pleasure from start to finish!
I hope you enjoy them! Let me know what you think!