


Hey All!
O.K., I have to give my wife serious props on this one. I was sitting around wracking my brains trying to figure out how the hell I'm going to do the cape for my new Dr. Strange custom. My wife senses the tension and asks me what's wrong. I tell her. She by reply, imparts upon me a craftswomans technique of creating rigid shapes like bells and roses etc. out of fabric as embellishments on decorative pillows and blankets, etc. The following is a step by step tutorial as to how we took that decorative technique and applied it to making capes for Marvel Universe figures. I am excited to share this easy technique that will help you customize a cape that will suit your figure to it's specific needs.
What you will need:
A portion of a 200 (or so) thread count bed sheet, white glue, water, scissors or an exacto blade, hot glue gun, clippers, and items of various size to prop up your wet cape (to be explained later), and of course a hero or villain to endow with your cape!
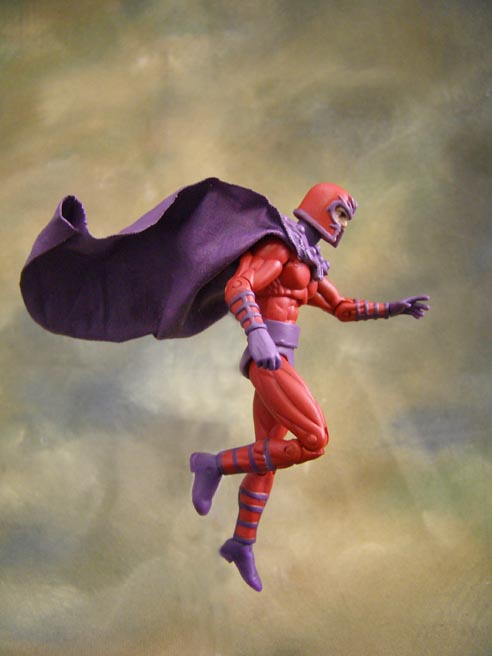
First take your portion of bed sheet (hopefully one that will have at last one factory edge) and iron it so that it is smooth and free of wrinkles. Then measure out the portion for the cape. This will vary from figure to figure. Dr. Strange's cape was huge... bigger than the figure could handle... as that is the nature of that figures cape. Magneto's however, is measured to the figures body and made in realistic proportion. The choice is yours. Size your cape based on the need and feel of your figure. Next, use a straight edge and a pencil to rule the shape of your cape (it should taper a bit at the end that connects to the figures neck, but again your judgement and trial and error are paramount) use a scissor and or an Exacto blade to cut the shape from the sheet making as straight a cut as possible. Don't worry about rough r frayed edges (which are inevitable) as you will be able to correct them later as directed.
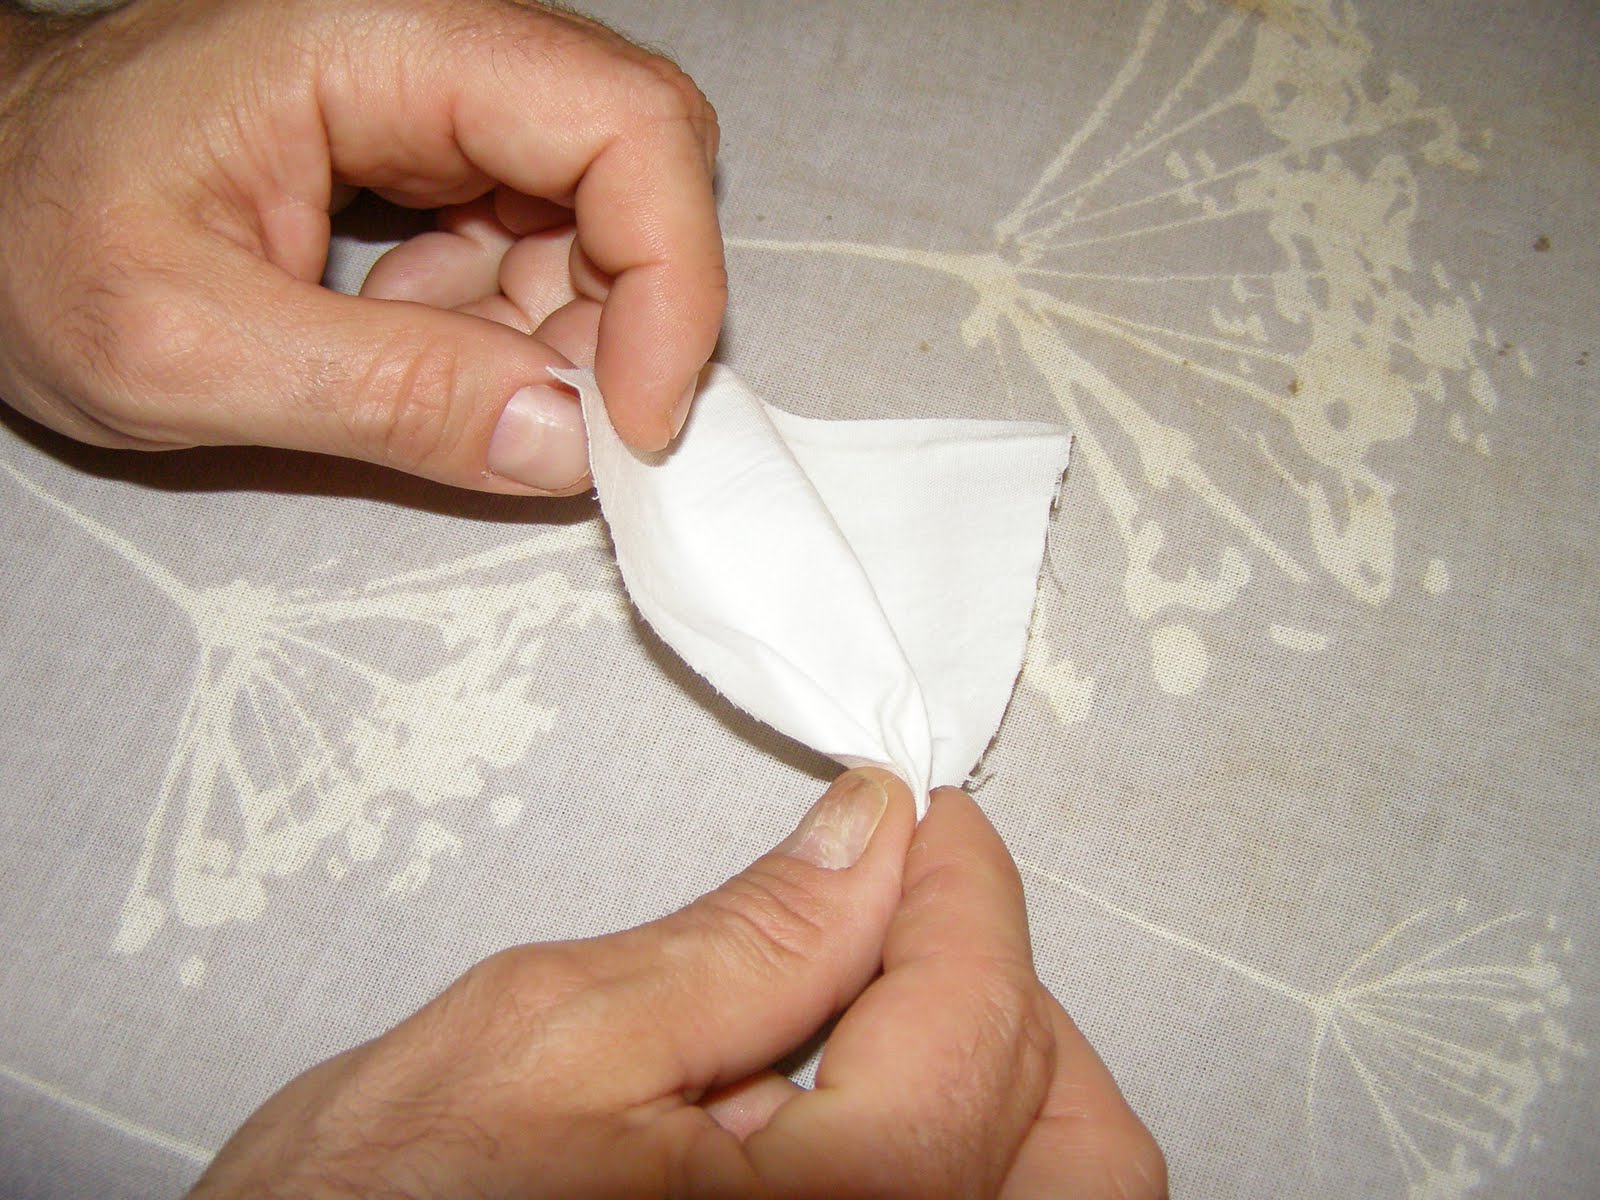
Taking the tapered end (the one that will connect to the neck) begin to fold the edge like an accordian and once completed return to the ironing board and iron the creases so that they are permanent. These will be the capes creases at the neck which will be the basis of the rest of the natural folds that will occur as you shape and form the cape to it's desired configuration.
Next grab your hot glue gun and begin to glue the accordian end of the cape to the figure as per your design. Mix the glue. Make a mixture of 50% white glue and 50% water. Taking a large, broad brush begin to coat the outside of the cape in the mixture being careful not to get any glue on your figure (keep a clean, damp cloth nearby for any mishaps). When completely saturated you will need short item nearby to prop your cape up to the desired design. Whatever you have will suffice. I grab nail polish bottles of various sizes from my wife's side of the medicine cabinet (thank God she's understanding), but anything at hand (and the right size) will do. Stand your figure and prop the cape onto the objects Your cape will be wet and soggy at this point. No problem. Let it dry for about an hour and return to it. At this point you will begin to be able to shape the cape into any configuration you desire. Once you have it you can let it dry overnight. Don't get to attached to what you've created, though. The next step is likely to cause some changes.
OK. You wake up the next morning and your cape is rigid and cool. Now it's time to pain the underside of the cape, again being careful not to get any glue on your figure. Keep in mind that second coating will cause your cape to once again become malleable so you will once again need to prop it up and form it after about an hour to your desired configuration. Be creative! You can use just about anything to prop and form your cape. Keep coming back during this stage and curl edges, pinch folds, etc. to make your cape as cool as possible. The possibilities are endless. Each time you make a cape you get better at it!
Once this second side is dry and rigid your cape is done. At this stage you can take your clippers and carefully clip the rough edges and stray threads off of the edges of the ridged cape. All that needs to be done now is to prime and paint it. It is imperative that you prime. The glue will reactivate if you put wet (watery) paint on (it is important that you thin the paint to the consistency of milk to coat the cape in two or three thin coats). The coat of prime will create a barrier between the unstable glue coating and the fluid paint. Once You're painted up you will not believe how cool your cape will look!
I hope this tutorial was helpful. Please feel free to contact me with any questions.